Introduction:
SQL Server 2008 Database Mail feature within SQL Server Instance. Database mail was introduced in SQL server 2005 and it was a new feature that Microsoft has added in SQL Server 2005. Database mail is also available in SQL Server 2008. I did not find any difference in Database mail in 2005 and in 2008. Database mail in SQL Server 2008 is an enterprise solution that is used to send emails from Database Engine component of SQL Server. Basic function of SQL Server 2008 Database Mail is to send alert messages to database administrators with issues related to performance, disk space, SQL Jobs, Backup plans, and other changes in the database schema. This is a very neat feature that helps database administrators to keep track of all activities in SQL Server Instances across all servers in the network. Database mail has better performance, easy to set up and more reliable than SQL Mail in SQL Server 2000. SQL Mail uses MAPI where as Database Mail uses SMTP. Another main point to remember on database mail is, it uses service broker service and this service need to be enabled in order to use Database Mail in SQL Server 2008. By default, database mail will not be enabled; there are different ways to configure it. We can enable it using system stored procedure, configuration manager or from the Database Mail Wizard during the set up.
Note: Database mail feature in SQL Server 2008 is not available in Express Edition.
What is Database Mail?
Database Mail is a mail queuing system. The email messages are stored in a queue within the msdb database waiting to be processed. When an email message is placed in the queue, an external process is triggered to send the email messages in the queue to the appropriate mail server. Once the email has been sent an email message with the status of the delivery is then posted back to SQL Server.
In order to send mail using Database Mail in SQL Server, there are 3 basic steps that need to be carried out. 1) Create Profile and Account 2) Configure Email 3) Send Email.
Step 1: Create Profile and Account
First step in Database Mail set up is creating a profile. Mail profile is the main element of Database Mail. A profile can have multiple email accounts added in that profile. Profile can be of two types, and they are:
Public Profile: A public profile is a mail profile set up in the database mail which can be accessed by any users and these users will have the ability to send emails.
Private Profile: A private profile is that profile in which users who are granted access to this profile can use to send emails.
- Connect to the SQL Server Management Studio.
- In the Object Explorer, Go to Management Node, expand Management Node, and Point to Database Mail option and Right-Click on it as shown in the figure below:

- Once Configure Database Mail option is clicked, Database Mail Configuration Wizard appears. This wizard helps to set up the database mail in SQL Server Instance as shown below.

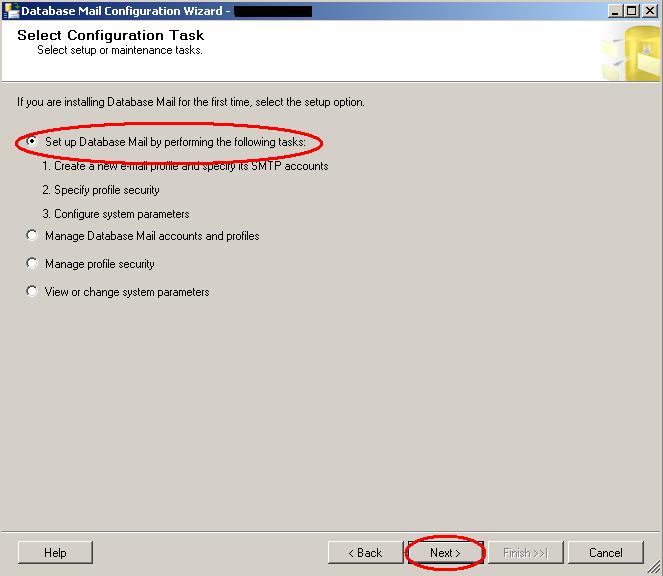
- Select Configuration Task window comes when Next button is clicked as shown above. Since i am setting up Database Mail for the first time therefore am selecting the Set up option as shown in the figure below. In this set step, new profile can be created, SMTP account will be added, security in the mail profile can be set up and system parameters can be configured. Click Next after select the set up option.
Note: In case, if Database Mail is already setup, we can choose to manage database mail and changing system parameters.


Here provide the details like Account name is Birthday Mail, Description is an optional. I have used my Gmail account as an Outgoing SMTP.
Under Outgoing Mail Server SMTP:
E-Mail Address: abc@gmail.com
Display Name: Enter Display Name in Email
Reply Email: It can be blank or we can use same email as above.
Server Name: smtp.gmail. com, this is SMTP server.
Port Number: default port number is 25 but Gmail smtp server port number to be used is 587 .
Secure Connection: We have to select SSL connection as shown in the picture for gmail.
Basic Authentication: Provide gmail account and password for this account.
and then Click OK to go back to New Profile window as shown below screen shot. Now, SMTP account details are added in the profile. Click Next to Go to Manage Security Window as shown below.

In this profile security management window, there are two options for selecting profiles which users are going to have access. They are public and private as shown in the below screen shot. Public profile can be accessed by all users, whereas private profile is accessed by only specific users. I have used Public profile where I have chosen Public profile. Also have to make this profile default, so have to select Yes option from the drop down menu from Default profile as shown in the below screen shot.
We can configure more than so select which profile you wants to use it and then click on next button.


To add more prohibited attachment file extensions, click on … on the right side of Configure System Parameters Window on Prohibited Attachment file Extensions under Systems Parameters column which is shown in screen shot. Once you add more extension values, Click OK to go back to Configure System Parameters Window as shown below. There are three levels of logging namely normal, verbose and extended.
I am using extended logging level as is the default one.


Step 2) Configure Email:
After the Account and the Profile are created successfully, we need to configure the Database Mail. To configure it, we need to enable the Database Mail XPs parameter through the sp_configure stored procedure, as shown here:
sp_CONFIGURE 'show advanced', 1

GO

RECONFIGURE

GO

sp_CONFIGURE 'Database Mail XPs',  1

GO

RECONFIGURE

GO
Step 3) Send Email:
To send the test email, go to Database Mail as shown in Database Mail Folder Screen shot Right click on Database Mail folder and the Click on Test Email … as shown in figure below.

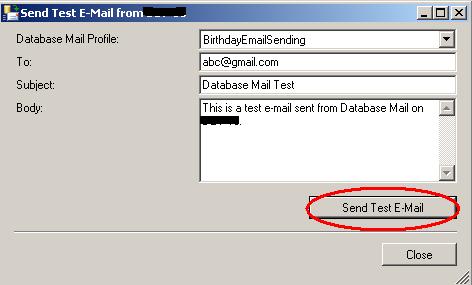
There is another way to test the sending mails after all configurations are done, we are now ready to send an email. To send mail, we need to execute a stored procedure sp_send_dbmail and provide the required parameters as shown below:
USE msdb

GO

EXEC sp_send_dbmail @profile_name='BirthdayEmailSending',

@recipients='abc@gmail.com',

@subject='Birthday message',

@body='This is the body of the test message.

Many many happy returns of the day...'
After all validations of the parameters entered are done, certain stored procedures are executed and the mail is queued by Service Broker
Database Mail keeps copies of outgoing e-mail messages and displays them in the sysmail_allitems, sysmail_sentitems, sysmail_unsentitems, sysmail_faileditems . The status of the mail sent can be seen in sysmail_mailitems table, when the mail is sent successfully the sent_status field of the sysmail_mailitems table is set to 1 which can again be seen in sysmail_sentitems table. The mails that are failed will have the sent_status field value to 2 and those are unsent will have value 3.
The log can be checked in sysmail_log table as shown below:
The log can be checked in sysmail_log table as shown below:
SELECT *

FROM sysmail_mailitems

GO

SELECT *

FROM sysmail_log

GO
After sending mail you can check the mail received in your inbox.
Reference Links:
- http://blog.sqlauthority.com/2008/08/23/sql-server-2008-configure-database-mail-send-email-from-sql-database/
- http://sql-articles.com/articles/dba/database-mail/
- http://www.sqlservercentral.com/blogs/databaseexpertisecom/2010/05/12/database-mail-set-up-in-sql-server-2008/
No comments:
Post a Comment