Saturday, May 19, 2012

Setup SQL Server 2008 Maintenance Plan Email Notifications

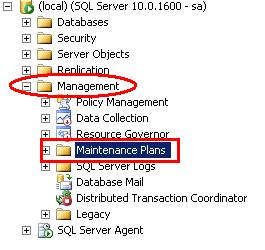
To take backup most of the SQL installs that I maintain, SQL dumps to disk and then copy to tape. I use a simple maintenance plan that dumps all user databases to the local disk and then a cleanup task that purges backup files older than a set number of days. An email alert with either success or fail in the subject line is sent out after each maintenance plan task is completed. Here we will review step by step how to add email notifications to your existing SQL 2008 maintenance plan.


Setting up an alert to e-mail an operator with a message is a multiple step process. You can setup database mail, define an operator and an alert. So how do you send an alert to an operator?
Step: 1
Database Mail: First setup database mail with a profile named "TestDb/SQLAlerts". The profile can be named anything but in these instructions, the profile name SQLAlerts is referenced. If you wish to use a different profile name just substitute accordingly. For procedures in setting up database mail, see this Post First
Step: 2
Define Operator : Connect to the instance using Microsoft SQL Management Studio
Double Click SQL Server Agent-->Right Click on Operators and select New Operator
Specify an operator Name, E-mail name
Select Ok button. New operator will be create.
Step: 3
Setup SQL Agent Settings
Note: This step is often overlooked when creating an alert for the first time. SQL Agent must be setup correctly for operators to receive an alert e-mail.
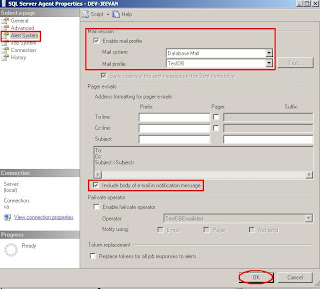
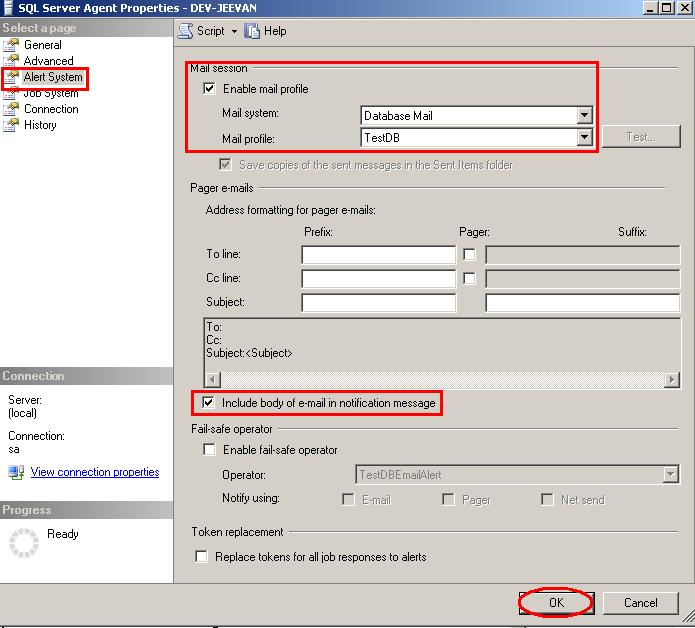
Right Click SQL Server Agent > select Properties
Popup window will display select Alert System in the left pane then follow below steps.
Checkmark > Enable mail profile
Verify Mail system: Database Mail
Verify Mail Profile: TestDB
Checkmark > Include body of e-mail in the notification message
Click OK.
Restart SQL Agent to activate settings.
Warning: Restarting SQL Agent will cancel any executing jobs.
Next, right click on designated maintenance plan (assuming one is already configured) and select Modify
This should bring up the design window with the current tasks
From the Toolbox window Drag and drop Notify Operator Task to Design window twice. One for success and the other for fail. Notify Operator Task, it shows cross mark.  
We need to configure to that to do that Double click each Notify Operator Task > check which operators to notify if there are more than one > fill out Subject and Body fields > select OK
Design window with the current tasks will look like this.
Connect the backup database task to each Notify Operator Task and make sure the arrows are pointing down.  Designate one of the Notify Operator Task objects connection arrows as Failure. Right click on connection and select Failure. This will turn the connection arrow red.
Save maintenance plan and test it.
One of the nice features of the Notify Operator Task in SQL 2008 that wasn't an option in SQL 2005 is the ability to add a unique subject line to the message. Its helpful to be able to see the success or fail status at a glance from just the subject line. 

Scheduling automated backup using SQL server 2008

Are you backing up your SQL Server 2008 databases daily?  You should be, especially if you don't want to lose any of your precious data that you're storing.  It's incredibly easy to setup a maintenance plan in SQL Server 2008 to automatically back up one or more databases. To get started backing up your databases using SQL Server Management Studio follow the steps below.
  1. Users to schedule the backup to be taken on a particular interval
  2. Once scheduled backup task completion we can send alert message to DBA.
  3. Delete the backup copies after a certain period of time
Here's how to setup automatic daily backups for SQL Server 2008 databases:
Schedule the database backup
Step: 1
Login to Sql Management studio and connect to the required database. Now from the object explorer, make sure SQL server agent is running, if not start SQL server agent(Right click and press start) as shown below screen shot.
Step: 2
Expand the Management Node from the object explorer, and then select the maintenance plan node. To schedule maintenance plan, you need to have “SYSADMIN” database role. If you dont see the maintenance node, make sure you have the necessary permission. As shown in the below screen. 
Step: 3
Right click the maintenance plan and then select “New Maintenance Plan”.
Step: 4
Enter the maintenance plan name in the popup box (This can be any name that identifies your task for ). This will identify your backup plan and you should choose a relevant name that suits your plan.
Step: 5
Now you will be in the configuration page for the maintenance plan. . Note the marked area, these are the areas you need to use for setting up the maintenance plan. The marked area in the right top will be used to configure the time that the plan executes. Choose a time so that the database is least used. The bottom left pane shows the tasks that can be utilized to create an sql maintenance plan.
Step: 6
Click on the calendar item shown in the right side top. This will bring the job schedule properties popup window that configure the execution time/frequency of the tasks. Configure the data carefully so that it suits your requirement. Usually database backups are taken daily basis. Make sure you are selecting proper time so that your database is least used. Click "Ok"once you finish.
Step: 7
From the maintenance plan tasks pane in the left side, select the Backup Up Database Task, this will be used to take backups for the databases. Drag and drop backup database task to the right side(as shown in the Screen shot). 
Step: 8
Form the above screen shot you can find Backup Up Databse Task is showing a Cross symbol. It means that it is not yet configured. To configure double click on the Backup Up Database Task, it will open up a new window that allows you to configure the database configuration for the backup. Here you configure the databases that you need to backup for one or more databases, then specify a location for the backup, specify the extension for the backup files etc.
From the pop up modal window, by clicking on “Databases” dropdown, you will be able to select the required databases. Also configure the file location, extension for the backup file etc.


Step: 8 
Click Ok once finished. Now backup plan configuration is over. The backup files will be created on the scheduled time to the mentioned folder. The name of the file will be created by appending the date so that you can identify the back up for a particular date.
Since the backup files are created frequently,… 

it is a good practice that you delete backup files after a certain period of time. For this you need to execute clean up task  along with the Maintenance plan. You can configure the clean up task as follows.
From the left side pane, drag and drop "Maintenance Cleanup Task."
Step: 9
Double click on the dropped item inorder to edit the clean up properties. Here you need to specify the backup location, and file extension for the back up files and specify the age of the file. It is a good practice that you keep one month old data, and delete anything prior to one month.
Once you click ok, then save the maintenance plan. 
Step: 10
After doing all these you can find scheduled backup task under Maintenance plan in the object folder. You can either wait till the next execution time or execute it manually in order to check whether everything is working fine. To execute manually select the plan and right click on it and then select "Execute" option. Check in the destination folder whether it is working fine or not.

Friday, May 18, 2012

Magic table in SQL ?

Magic tables are nothing but INSERTED, DELETED table scope level, These are not physical tables, only Internal tables.

This Magic table are used In SQL Server 6.5, 7.0 & 2000 versions with Triggers only. But, In SQL Server 2005, 2008 & 2008 R2 Versions can use these Magic tables with Triggers and Non-Triggers also.

Using with Triggers:If you have implemented any trigger for any Tables then,
1.Whenever you Insert a record on that table, That record will be there on INSERTED Magic table.
2.Whenever you Update the record on that table, That existing record will be there on DELETED Magic table and modified New data with be there in INSERTED Magic table.
3.Whenever you Delete the record on that table, That record will be there on DELETED Magic table Only.

These magic table are used inside the Triggers for tracking the data transaction.
Using Non-Triggers:You can also use the Magic tables with Non-Trigger activities using OUTPUT Clause in SQL Server 2005, 2008 & 2008 R2 versions.

Wednesday, May 9, 2012

Line Break In SQL Sever...


I need to format a string, like separate lines.  While displaying that string i need split into two lines. To do that follow the bellow steps. we have two different options to get new line.
What is difference between Line Feed (\n) and Carriage Return (\r)?
   1. Line Feed – LF – \n – 0x0a – 10 (decimal)
   2. Carriage Return – CR – \r – 0x0D – 13 (decimal)
Different operating systems have a different way of understanding new line. Mac only understands ‘\r’ as new line, while Unix and Linux understand ‘\n’ as new line character. Our favorite OS windows needs both the characters together to interpret as new line, which is ‘\r\n’. This is the reason why a file created in one OS does not open properly in another OS and makes it messy.

we can create a new line in SQL Server. It is a very simple script yet very useful when we have to do run print something or generate scripts. Here is two examples below that are very easy to understand. In the first example, there are no new line chars inserted and for the same, everything is displayed in a single line. However, in the second example, new line char is inserted and the lines are separated with a new line.
Example 1: No new line feed char
DECLARE @NewLineChar AS CHAR(2) = CHAR(13) + CHAR(10)
PRINT ('SELECT FirstLine AS FL SELECT SecondLine AS SL' )
GO
Example 2: With new line feed char

DECLARE @NewLineChar AS CHAR(2) = CHAR(13) + CHAR(10)
PRINT ('SELECT FirstLine AS FL ' +@NewLineChar +'SELECT SecondLine AS SL' )
GO

Tuesday, May 1, 2012

Claim DB Space After Deleting Records in Table - Reduce DB Space


Recently I have deleted unwanted records from my SQL server database table, what i realise is even after deleting records, space used by database is not reducing.  After browsing help available on Internet, I found out
1) Whenever we delete records from table, sql server doesn't reduce size of database immediately.
2) Even after deleting table , sql server doesn't reduce size of database.
3) Instead of Freeing space for deleted records, sql server marks pages containing deleted records as free pages, showing that they belong to the table. When new data are inserted, they are put into those pages first. Once those pages are filled up, SQL Server will allocate new pages.

So In order to claim database space after deleting records in Table, go through following steps:
1) Check what is Size of your Database using following command?EXEC SP_SPACEUSED


2) Delete Records from table, If you have already did that skip this step.


3) 
Run below command to claim unused database space.
DBCC SHRINKDATABASE(0)


DBCC SHRINKDATABASE command - Shrinks the size of the data and log files in the specified database.


Best Practise to use this command1. 
1.A shrink operation is most effective after an operation that creates lots of unused space, such as a truncate table or a drop table operation.
2. Most databases require some free space to be available for regular day-to-day operations. If you shrink a database repeatedly and notice that the database size grows again, this indicates that the space that was shrunk is required for regular operations. In these cases, repeatedly shrinking the database is a wasted operation.
3. A shrink operation does not preserve the fragmentation state of indexes in the database, and generally increases fragmentation to a degree. This is another reason not to repeatedly shrink the database.

More reading on this command
http://msdn.microsoft.com/en-us/library/ms190488.aspx