Change Data Capture records INSERTs, UPDATEs, and DELETEs applied to SQL Server tables, and makes a record available of what changed, where, and when, in simple relational 'change tables' rather than in an esoteric chopped salad of XML. These change tables contain columns that reflect the column structure of the source table you have chosen to track, along with the metadata needed to understand the changes that have been made. Pinal Dave explains all, with plenty of examples in a simple introduction.
Often, you’ll be told that the specification of an application requires that the value of data in the database of an application must be recorded before it is changed. In other words, we are required to save all the history of the changes to the data. This feature is usually implemented for data security purposes. To implement this, I have seen a variety of solutions from triggers, timestamps and complicated queries (stored procedures) to audit data.
SQL Server 2005 introduced the new features of ‘after update’, ‘after insert’ and ‘after delete’ triggers that almost solved the problem of tracking changes in data. A better solution was introduced in SQL Server 2008 and is called Change Data Capture (CDC). CDC has allowed SQL Server developers to deliver SQL Server data archiving and capturing without any additional programming.
CDC is one of the new data tracking and capturing features of SQL Server 2008. It only tracks changes in user-created tables. Because captured data is then stored in relational tables, it can be easily accessed and retrieved subsequently, using regular T-SQL.
When you apply Change Data Capture features on a database table, a mirror of the tracked table is created with the same column structure of the original table, but with additional columns that include the metadata used to summarize the nature of the change in the database table row. The SQL Server DBA can then easily monitor the activity for the logged table using these new audit tables .
Enabling Change Data Capture on a Database
CDC first has to be enabled for the database. Because CDC is a table-level feature, it then has to be enabled for each table to be tracked. You can run following query and check whether it is enabled for any database.
USE master
GO SELECT [name], database_id, is_cdc_enabled
FROM sys.databases
GO
This query will return the entire database name along with a column that shows whether CDC is enabled.
You can run this stored procedure in the context of each database to enable CDC at database level. (The following script will enable CDC in AdventureWorks database. )
USE AdventureWorks

GO EXEC sys.sp_cdc_enable_db
GO
As soon as CDC is enabled, it will show this result in SSMS.
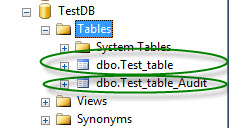
Additionally, in the database AdventureWorks, you will see that a schema with the name ‘cdc’ has now been created.
Some System Tables will have been created within the AdventureWorks database as part of the cdc schema.
The table which have been created are listed here.
- cdc.captured_columns – This table returns result for list of captured column.
- cdc.change_tables – This table returns list of all the tables which are enabled for capture.
- cdc.ddl_history – This table contains history of all the DDL changes since capture data enabled.
- cdc.index_columns – This table contains indexes associated with change table.
- cdc.lsn_time_mapping – This table maps LSN number (for which we will learn later) and time.
Enabling Change Data Capture on one or more Database Tables
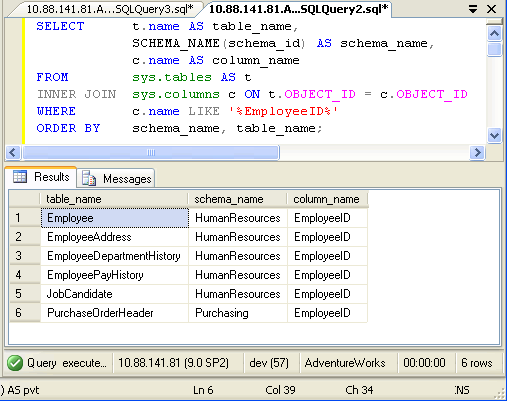
The CDC feature can be applied at the table-level to any database for which CDC is enabled. It has to be enabled for any table which needs to be tracked. First run following query to show which tables of database have already been enabled for CDC.
USE AdventureWorks
GO
SELECT [name], is_tracked_by_cdc
FROM sys.tables
GO
The above query will return a result that includes a column with the table name, along with a column which displays if CDC is enabled or not.
You can run the following stored procedure to enable each table. Before enabling CDC at the table level, make sure that you have enabled SQL Server Agent. When CDC is enabled on a table, it creates two CDC-related jobs that are specific to the database, and executed using SQL Server Agent. Without SQL Server Agent enabled, these jobs will not execute.
Additionally, it is very important to understand the role of the required parameter @role_name. If there is any restriction of how data should be extracted from database, this option is used to specify any role which is following restrictions and gating access to data to this option if there is one. If you do not specify any role and, instead, pass a NULL value, data access to this changed table will not be tracked and will be available to access by everybody.
Following script will enable CDC on HumanResources.Shift table.
USE AdventureWorks
GO EXEC sys.sp_cdc_enable_table
@source_schema = N'HumanResources',
@source_name = N'Shift',
@role_name = NULL
GO
As we are using AdventureWorks database, it creates the jobs with following names.
- cdc.AdventureWorks_capture – When this job is executed it runs the system stored procedure sys.sp_MScdc_capture_job. The procedure sys.sp_cdc_scan is called internally by sys.sp_MScdc_capture_job. This procedure cannot be executed explicitly when a change data capture log scan operation is already active or when the database is enabled for transactional replication. This system SP enables SQL Server Agent, which in facts enable Change Data Capture feature.
- cdc.AdventureWorks_cleanup – When this job is executed it runs the system stored procedure sys.sp_MScdc_cleanup_job. This system SP cleans up database changes tables.
The Stored Procedure sys.sp_cdc_enable_table enables CDC. There are several options available with this SP but we will only mention the required options for this SP. CDC is very powerful and versatile tool. By understanding the Stored Procedure sys.sp_cdc_enable_table you will gain the true potential of the CDC feature. One more thing to notice is that when these jobs are created they are automatically enabled as well.
By default, all the columns of the specified table is taken into consideration of this operation. If you want to only few columns of this table to be tracked in that case you can specify the columns as one of the parameters of above mentioned SP.
When everything is successfully completed, check the system tables again and you will find a new table called cdc.HumanResources_Shift_CT. This table will contain all the changes in the table HumanResources.Shift. If you expand this table, you will find five additional columns as well.
As you will see there are five additional columnsto the mirrored original table
- __$start_lsn
- __$end_lsn
- __$seqval
- __$operation
- __$update_mask
There are two values which are very important to us is __$operation and __$update_mask.
Column _$operation contains value which corresponds to DML Operations. Following is quick list of value and its corresponding meaning.
- Delete Statement = 1
- Insert Statement = 2
- Value before Update Statement = 3
- Value after Update Statement = 4
The column _$update_mask shows, via a bitmap, which columns were updated in the DML operation that was specified by _$operation. If this was a DELETE or INSERT operation, all columns are updated and so the mask contains value which has all 1’s in it. This mask is contains value which is formed with Bit values.
Example of Change Data Capture
We will test this feature by doing DML operations such as INSERT, UPDATE and DELETE on the table HumanResources.Shift which we have set up for CDC. We will observe the effects on the CDC table cdc.HumanResources_Shift_CT.
Before we start let’s first SELECT from both tables and see what is in them.
USE AdventureWorks
GO SELECT *
FROM HumanResources.Shift
GO USE AdventureWorks
GO SELECT *
FROM cdc.HumanResources_Shift_CT
GO
The result of the query is as displayed here.
The original table HumanResources.Shift has three rows in it, whereas the table cdc.HumanResources_Shift_CT is totally empty. This table will have entries after an operation on the tracked table.
Insert Operation
Lets run an INSERT operation on the table HumanResources.Shift.
USE AdventureWorks
GO INSERT INTO [HumanResources].[Shift]
([Name],[StartTime],[EndTime],[ModifiedDate])
VALUES ('Tracked Shift',GETDATE(), GETDATE(), GETDATE())
GO
Once the script is run, we will check the content of two of our tables HumanResources.Shift and cdc.HumanResources_Shift_CT.
Because of the INSERT operation, we have a newly inserted fourth row in the tracked table HumanResources.Shift . The tracking table also has the same row visible. The value of _operation is 2 which means that this is an INSERT operation.
Update Operation
To illustrate the effects of an UPDATE we will update a newly inserted row.
USE AdventureWorks
GO
UPDATE [HumanResources].[Shift]
SET Name = 'New Name',
ModifiedDate = GETDATE()
WHERE ShiftID = 4
GOOnce more, we check our tables HumanResources.Shift and cdc.HumanResources_Shift_CT.
UPDATE operations always result in two different entries in the tracking table. One entry contains the previous values before the UPDATE is executed. The second entry is for new data after the UPDATE is executed. In our case we have only changed two columns of the table but we are tracking the complete table so all the entries in the tableare logged before, and after, the update happens. The Change Data Capture mechanism always captures all the columns of the table unless, when CDC is set up on a table, it is restricted to track only a few columns. We will see how this can be done later on this article.
Delete Operation
To verify this option we will be running a DELETE operation on a newly inserted row.
USE AdventureWorks
GO DELETE
FROM [HumanResources].[Shift]
WHERE ShiftID = 4
GO
Once this script is run, we can see the contents of our tables HumanResources.Shift and cdc.HumanResources_Shift_CT.
Due to the DELETE operation, we now have only three rows in the tracked table HumanResources.Shift We can see the deleted row visible in the tracking table as new entry. The value of _operation is 4 , meaning that this is a delete operation.
Change Data Capture and Operations
We have now verified that, by using CDC, we are able to capture all the data affected by DML operation. In the tracked table we have four values of the operation. We can see this operation’s value in the following image.
Understanding Update mask
It is important to understand the Update mask column in the tracking table. It is named as _$update_mask. The value displayed in the field is hexadecimal but is stored as binary.
In our example we have three different operations. INSERT and DELETE operations are done on the complete row and not on individual columns. These operations are listed marked masked with 0x1F is translated in binary as 0b11111, which means all the five columns of the table.
In our example, we had an UPDATE on only two columns – the second and fifth column. This is represented with 0x12 in hexadecimal value ( 0b10010 in binary). Here, this value stands for second and fifth value if you look at it from the right, as a bitmap. This is a useful way of finding out which columns are being updated or changed.
The tracking table shows two columns which contains the suffix lsn in them i.e. _$start_lsn and _$end_lsn. These two values correspond to the Log Sequential Number. This number is associated with committed transaction of the DML operation on the tracked table.
Disabling Change Data Capture on a table
Disabling this feature is very simple. As we have seen earlier, if we have to enable CDC we have to do this in two steps – at table level and at database level,: In the same way, when we have to disable this feature, we can do this at same two levels. Let us see both of them one after one.
For dropping any tracking of any table we need three values the Source Schema, the Source Table name, and the Capture Instance. It is very easy to get schema and table name. In our case, the schema is HumanResource and table name is Shift, however we do not know the name of the Capture Instance. We can retrieve it very easily by running following T-SQL Query.
USE AdventureWorks;
GO
EXEC sys.sp_cdc_help_change_data_capture
GO
this will return a result which contains all the three required information for disabling CDC ona table.
The Stored Procedure sys.sp_cdc_help_change_data_capture provides lots of other useful information as well. Once we have name of the capture instance, we can disable tracking of the table by running this T-SQL query.
USE AdventureWorks;
GO
EXECUTE sys.sp_cdc_disable_table
@source_schema = N'HumanResources',
@source_name = N'Shift',
@capture_instance = N'HumanResources_Shift';
GOOnce Change Data Capture is disabled on any table, it drops the change data capture table as well all the functions which were associated with them. It also deletes all the rows and data associated with this feature from all the system tables and changes relevant data in catalog views.
In our example, we can clearly see that capture table cdc.HumanResources_Shift_CT is dropped.
Disable Change Data Capture Feature on Database
This is the easiest task out of all process. Running following T-SQL query will disable CDC on whole database.
USE AdventureWorks
GO EXEC sys.sp_cdc_disable_db
GO
This Stored Procedure will delete all the data, functions, tables related to CDC. If this data is needed for any reason, you must take a backup before dropping CDC from any database
Capture Selected Column
When CDC is enabled on any table, it usually captures the data of all the columns. During INSERT or DELETE operations, it is necessary to capture all the data but in UPDATE operations only the data of the updated columns are required. CDC is not yet advanced enough to provide this kind of dynamic column selection but CDC can let you select the columns from which changes to data should be captured from the beginning.
This stored procedure should be run in the context of each database to enable it at database level. Following script will enable CDC in AdventureWorks database.
USE AdventureWorks
GO EXEC sys.sp_cdc_enable_db
GO
Now we will enable this feature at table level but for selected columns of ShiftID and Name only. This script will enable table-level change data capture for only two columns.
USE AdventureWorks
GO EXEC sys.sp_cdc_enable_table
@source_schema = N'HumanResources',
@source_name = N'Shift',
@role_name = NULL,
@captured_column_list = '[ShiftID],[Name]'
GO
So what’s in the system table which will be created by data capturing purpose in AdventureWorks Database?
So you can see that there are now only two rows which are tracked.
We will change the data of one of the columns that weren’t specified so as to see the value in cdc.HumanResources_Shift_CT table.
Before we start let us first select from both of the table and observe its content.
USE AdventureWorks
GO SELECT *
FROM HumanResources.Shift
GO USE AdventureWorks
GO SELECT *
FROM cdc.HumanResources_Shift_CT
GO
Here is the result.
The original table HumanResources.Shift now has three rows in it; whereas table cdc.HumanResources_Shift_CT is totally empty. Lets update ModifiedDate for ShiftID =1 and see if that record creates an entry in the tracking table.
USE AdventureWorks
GO UPDATE [HumanResources].[Shift]
SET ModifiedDate = GETDATE()
WHERE ShiftID = 3
GO
Now to check the contents of the tracking table table cdc.HumanResources_Shift_CT and see whether that change is captured.
The tracking table is empty because it only tracks the changes which it contains, and it ignores any changes in other columns.
Retrieve Captured Data of Specific Time Frame
Quite often, one is asked for data to be tracked over a time interval. If you look at the tracking data there is apparently no time captured at all. It always provides all the information. However, there are few fields which can definitely help us out i.e. _$start_lsn . LSN stands for Last Sequence Number. Every record in transaction log is uniquely identified by a LSN. They are always incrementing numbers.
LSN numbers are always associated with time and their mapping can be found after querying system table cdc.lsn_time_mapping. This table is one of the tables which was created when AdventureWorks database was enabled for CDC. You can run this query to get all the data in the table cdc.lsn_time_mapping.
USE AdventureWorks
GO SELECT *
FROM cdc.lsn_time_mapping
GO
When this query is run it will give us all the rows of table. It is a little difficult to find the necessary information from all the data. The usual case is when we need to inspect a change that occurred in a particular time period.
We can find the time that corresponds to the LSN by using the system function sys.fn_cdc_map_time_to_lsn. If we want all the changes done yesterday, we can run this function as described below and it will return all the rows from yesterday.
Before we run this query let us explore two table valued functions (TVF) in AdventureWorks database. You can see that there are two new TVF are created with schema cfc. These functions are created when table level CDC was enabled.
The function cdc.fn_cdc_get_all_changes_HumanResources_Shift can be used to get events that occurred over a particular time period. You can run this T-SQL script to get event happened during any specific time period. In our case, we will be retrieving this data for the past 24 hours.
Following query should do retrieve data which was modified in the past 24 hours..
USE AdventureWorks
GO DECLARE @begin_time DATETIME, @end_time DATETIME, @begin_lsn BINARY(10), @end_lsn BINARY(10);
SELECT @begin_time = GETDATE()-1, @end_time = GETDATE();
SELECT @begin_lsn = sys.fn_cdc_map_time_to_lsn('smallest greater than', @begin_time);
SELECT @end_lsn = sys.fn_cdc_map_time_to_lsn('largest less than or equal', @end_time);
SELECT *
FROM cdc.fn_cdc_get_all_changes_HumanResources_Shift(@begin_lsn,@end_lsn,'all')
GO
we have used relational operations in the function sys.fn_cdc_map_time_to_lsn. There can be total of four different relational operations available to use in that function:
- largest less than
- largest less than or equal
- smallest greater than
- smallest greater than or equal
This way captured data can be queried very easily and query based on time interval.
Automatic Clean Up Process
If we track every change of all the data in our database, there is very good chance that we will outgrow the hard drive of main server. This will also lead to issues with maintenance and input/output buffer issues.
In CDC this there is automatic cleanup process that runs at regular intervals. By default the interval is of 3 days but it can be configured. We have observed that, when we enable CDC on the database, there is one additional system stored procedure created with the name sys.sp_cdc_cleanup_change_table which cleans up all the tracked data at interval.


